
Using a Shoe Stretcher to Stretch Shoes Wider
The excitement of wearing a new pair of shoes can wear off quickly when you realize they’re too tight to fit your feet comfortably. Another common scenario is having to wear shoes when you have a painful foot condition or swollen feet. Fortunately, you don’t have to get rid of your shoes when faced with either scenario. That’s because you can learn how to stretch your shoes wider using a shoe stretcher tool.
What are shoe stretchers?
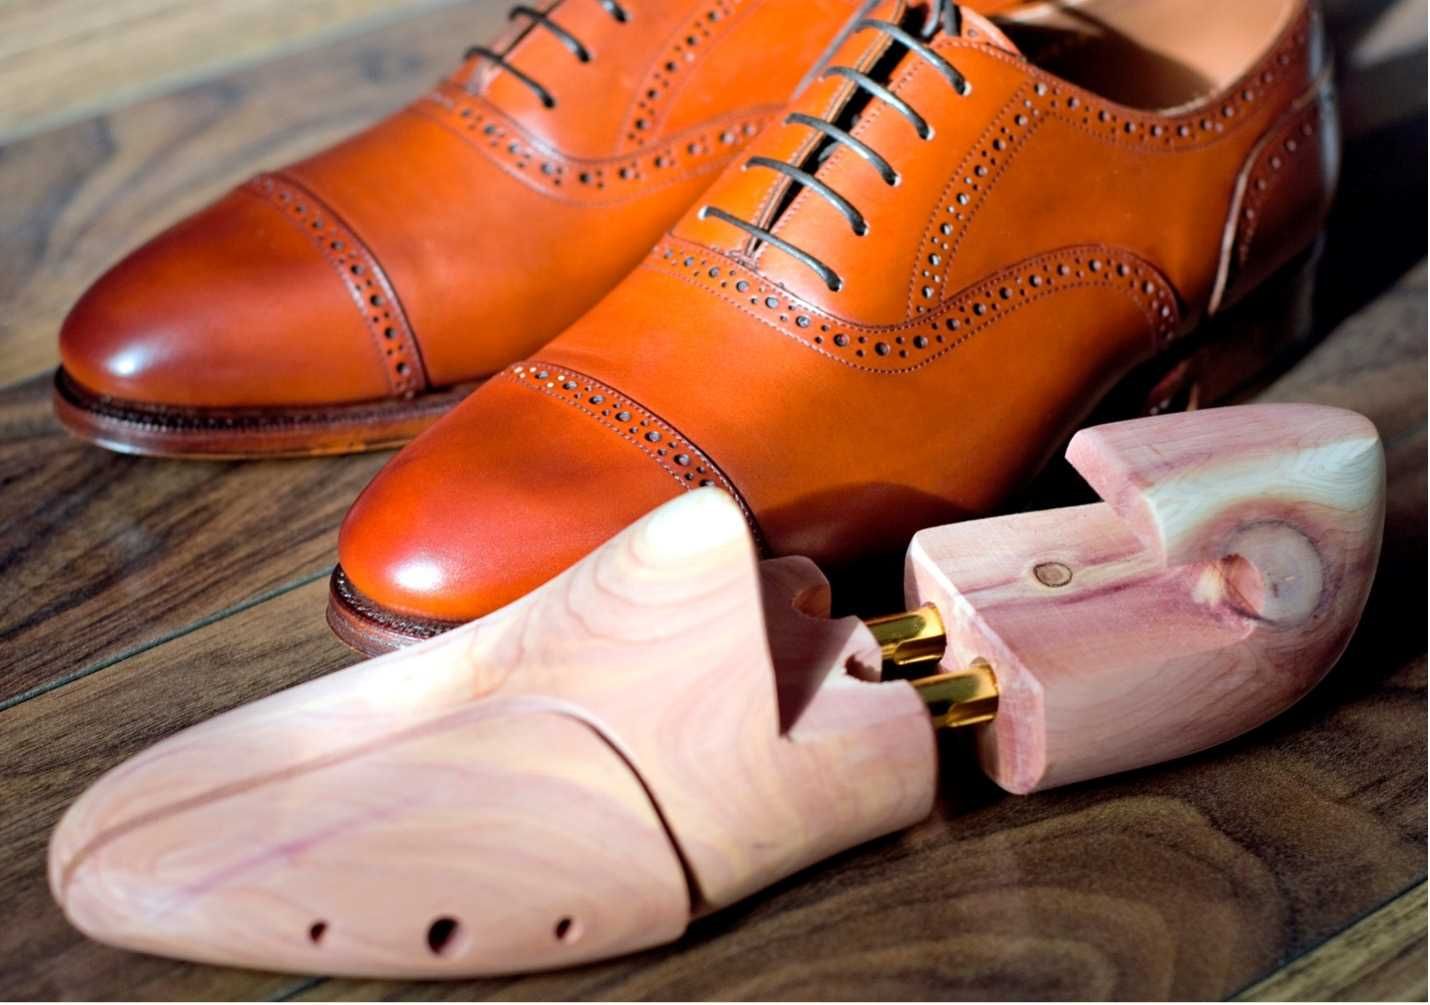
As their name implies, the shoe stretcher is a tool designed specifically to stretch out the shoe’s material in a way that doesn’t damage the shoe’s structure. The traditional stretcher is made from carved wood pieces attached to a strong mechanism with a hand crank made from metal.
How does a shoe get stretched?
Stretchers work by manually operating the mechanism in a way that allows the shoe to be stretched using gentle force. The hardness of the wood is key to forcing the material to expand and remain expanded. Plugs are included for increasing the stretch for areas where toes have painful bunions or corns.
What are the different types of shoe stretchers?
You can find stretching tools that accommodate how you need the shoe to be stretched.
Two-Way Shoe Stretcher
Invented in the early 1900s, this shoe-stretching design is considered a classic. The basic design uses a large, foot shaped front wood piece and a smaller back wood piece. When the handle is cranked, the large piece stretches the front of the shoe, while the small piece stretches the back of the shoe. It’s such a well-functioning design that it’s still used today.
In fact, you can find modern wood shoe stretchers in styles suitable for various shoe sizes. It’s a good choice for stretching both width and length.
Width Shoe Stretcher
This stretching tool is for those who want to focus more on widening the width of the shoe. This style has a design that includes a mechanism that makes the stretcher expand sideways. This tool can help to alleviate shoes that are too tight around the midfoot and forefoot areas.
Instep Shoe Stretcher
This stretcher targets the instep with its contoured design. Its purpose is to loosen shoe material that feels tight around the foot arch and instep. When the handle is turned, the stretcher expands upward to target the top portion of the shoe.
Spot Shoe Stretchers
This stretcher has a completely different design than most shoe stretchers. Also, known as a bunion stretcher, it typically has a ball end, ring end and locking wheel. Its purpose is to target very specific areas within the shoe for expansion.
How to Use a Wooden Two-Way Shoe Stretcher
The two-way stretcher made with wood is the most popular choice for those who want to learn how to use a shoe stretcher. It’s also the best choice if you want to know how to stretch shoes immediately. Keep in mind that you are always going to have to wait a bit for the shoe to stretch. So, plan to do the stretching the day, or night, before you want to wear the shoes.
It typically takes an average of six to eight hours to see results. And, depending on the shoe material, it may be best to leave the stretcher inside the shoe overnight. Another thing to remember when looking at shoe stretchers is that you can get a single stretcher or a set of two. Getting two stretchers is highly recommended because it’s faster to stretch a pair of shoes.
Step 1: Evaluate the shoe fit problem. Look over the shoe and figure out exactly where it needs to be stretched. Decide if you want to stretch length or width and if there needs to be more room at the toes.
Step 2: Adjust the stretcher. A great thing about the classic wooden stretcher design is that is offers a lot of adjustability. The first thing you may want to do is turn the handle to adjust its length to fit inside the shoe. If you’re dealing with corns or bunions, you are going to want to decide where to put the included plugs to add extra stretch for alleviating pressure on those painful spots.
Step 3: Prepare the stretcher. While you don’t have to do this, it’s a good idea to dampen the inside of the shoe using a moist cloth. Moisture helps make the shoe material more pliable for stretching.
Step 4: Insert the stretcher. The toe end of the front piece should align with the toe box of the shoe. And the smaller wood piece should be completely inside the shoe.
Step 5: Start stretching. Turn the handle or knob that makes the mechanism stretch the width. Do this gradually so that you can control the amount of stretching. Small increments work best for maintaining the structural integrity of the shoe.
Step 6: If you want to increase the shoe’s length, you can turn the mechanism for the small heel piece. Be sure to go slow to avoid overstretching the back.
Step 7: Let it sit. Shoes take time to stretch, and the bare minimum wait time for results is between six and eight hours. In many cases, you may find that it can take up to 24 hours for stretching to create the fit you want.
Use Shoehorns for Simple Stretching
Shoehorns are a popular handheld metal tool with a curved design that make it easy to slip your feet into a pair of shoes. Unlike shoe stretchers, shoehorns don’t permanently alter the shoe’s structure. Instead, it uses the weight of your foot as leverage to create forward pressure.
Shoehorns come in a variety of sizes and the best ones for seniors and disabled persons to use are the ones with long handles. With little effort, you can use it to gently glide your foot into the shoe.